Understanding the Impact of High Disk Usage from Windows Defender
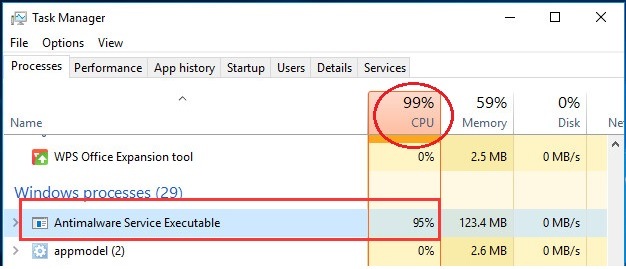
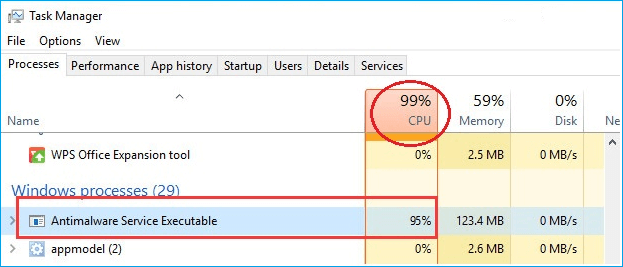
But sometimes, the Windows Defender Antivirus Executable process hogs too much disk space. Windows Defender Antivirus runs quietly in the background, protecting your computer from threats all the time. Your computer slows down, apps freeze or stutter, and boot times can drag on forever. Defender digs through files and runs constant real-time checks that hammer the disk.
Even on new PCs with SSDs, Defender can dominate resources. That spike in disk usage usually hits during scheduled scans or when Defender detects something odd. It doesn’t just slow things—it can freeze your work, interrupt gaming, or throw off tasks that rely on quick disk reads and writes.
How To Fix High Disk Usage Caused By Windows Defender Antivirus Executable shows real ways to lower this without switching off your antivirus. You won’t turn off Defender here—just tweak or troubleshoot it for smoother running.
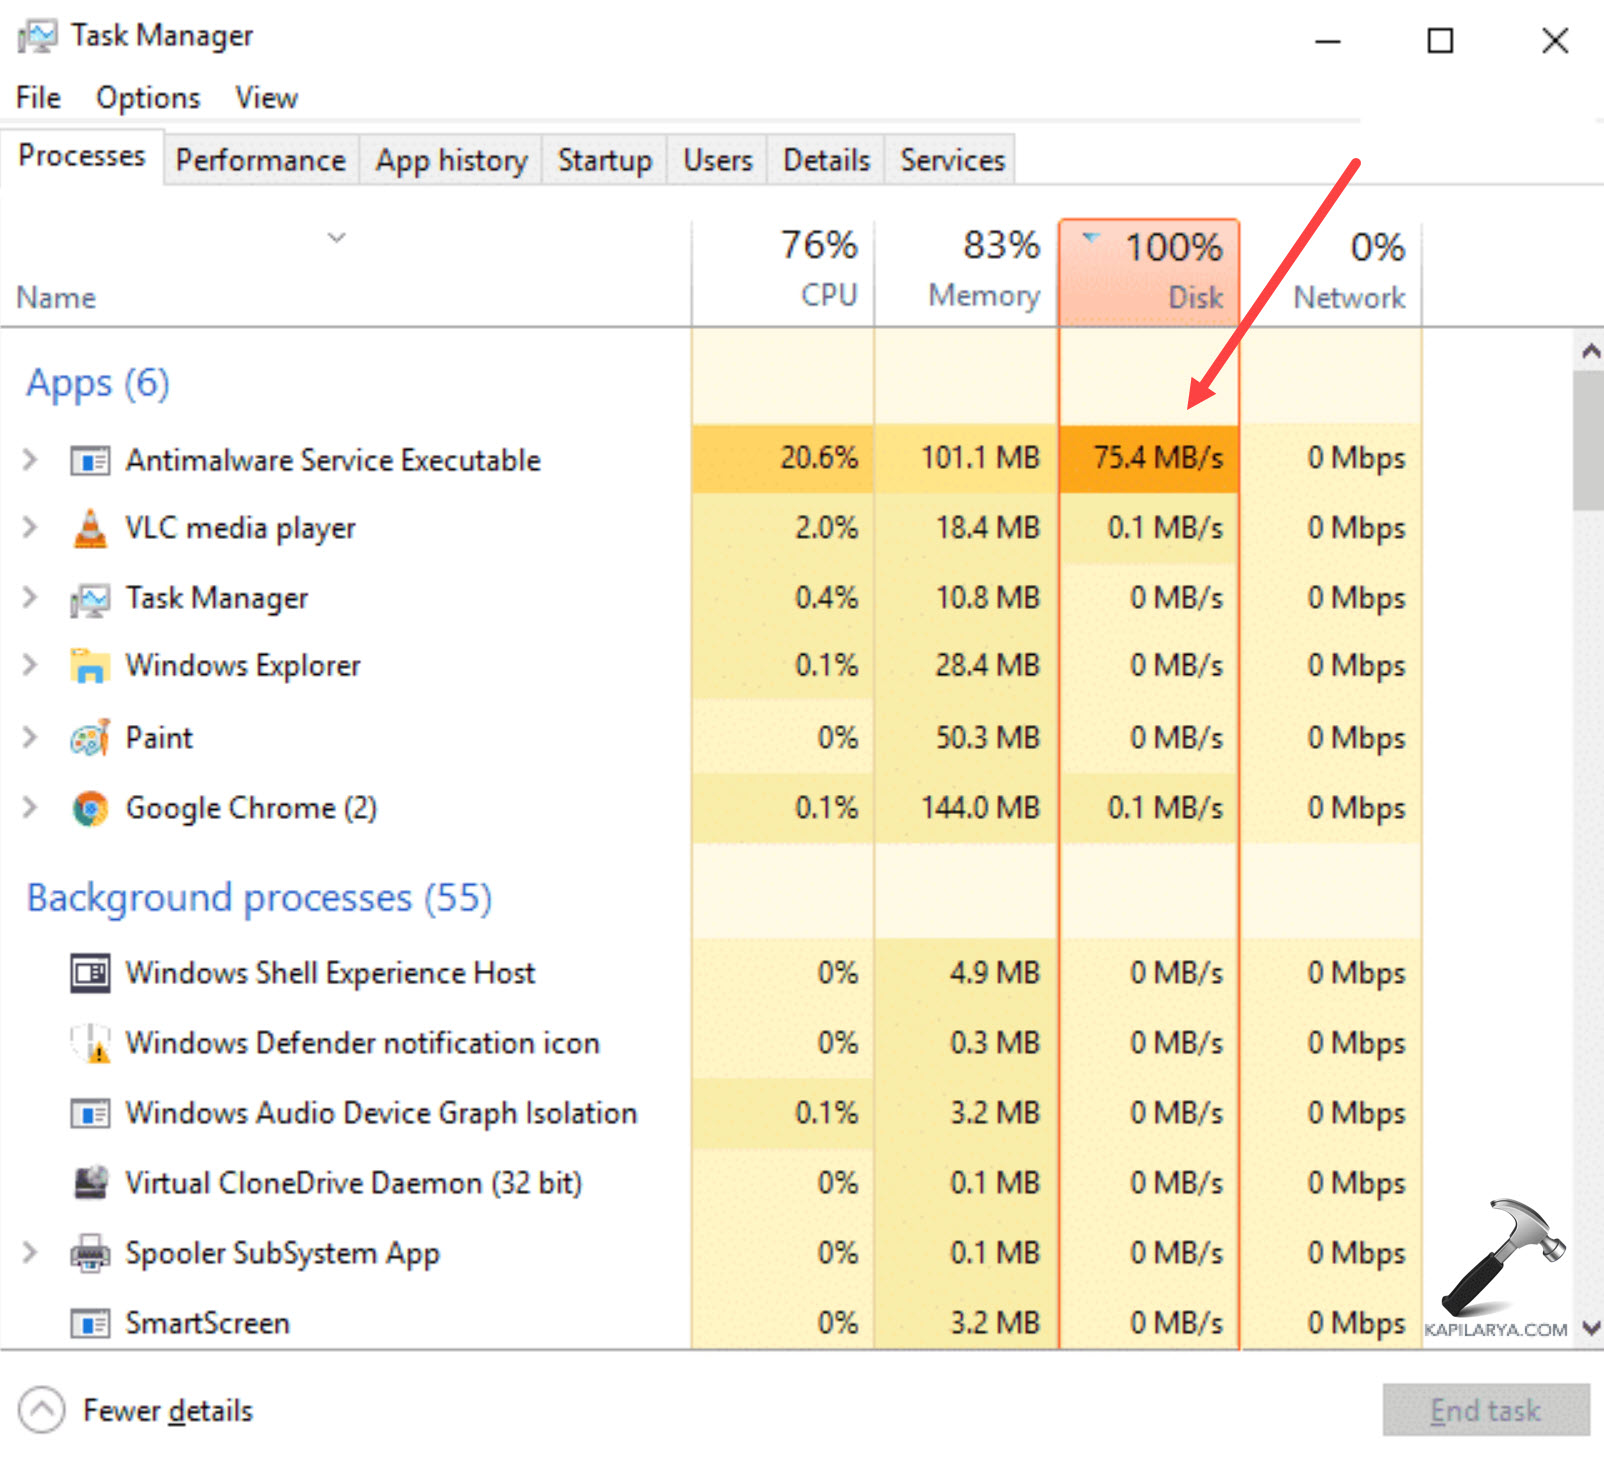
- Spotting stuck or repeat Defender scans and cutting them back.
- Tuning Defender’s settings for a better speed-security balance.
- Clearing out system file errors that pile on disk work.
- Using Windows tools to spot clashing processes and other disk hogs.
Get these tips working to speed up your PC while Defender keeps watch. Next, you’ll find clear, practical steps to fix this. For deeper tech details, Microsoft’s official page on Windows Defender performance dives into how Defender uses resources here.
- Preliminary Checks
- Step 1: Disable or Reschedule Windows Defender Scan
- Step 2: Exclude the Windows Defender Folder from Scans
- Step 3: Update Windows Defender Definitions and Windows OS
Essential Preliminary Checks Before Troubleshooting
- Verify Windows Version and Updates. Your machine needs the latest Windows build. Older versions can make the Windows Defender Antivirus Executable behave oddly. Head over to Settings > Update & Security > Windows Update. Hit “Check for updates” and install everything waiting.
- Inspect Disk Health Status. A tired or failing disk can push usage numbers way too high, messing with diagnostics. Fire up an improved Command Prompt and run
chkdsk /f /r. This hunt cleans up bad sectors and fixes file system errors that might trigger Defender’s heavy disk pounding. - Confirm Absence of Conflicting Antivirus Software. Running two antivirus programs together usually sparks system conflicts. That friction can throw disk usage through the roof. Swing by Control Panel > Programs > Programs and Features to check no third-party antivirus is sharing space with Defender.
- Evaluate System Disk Space Availability. When free disk space drops under 15%, Windows slows down hard. Defender’s scans lag and soar in usage. Open File Explorer, click This PC, and eyeball your remaining storage.
- Review Background Tasks and Scheduled Scans. Defender scans might overlap or clash with other background routines. Peek into Task Scheduler and fish out Defender-related jobs. Watch for back-to-back scans or too-frequent triggers causing abnormal disk bursts.
- Run a Full Malware Scan. Some sneaky malware imitates Defender processes or jams them up, pushing resource spikes. Start a full Defender scan. It’s the cleanest way to rule out infections messing with the antivirus executable’s disk behavior.
- Check for Recently Installed Software or System Changes. Fresh programs or Windows updates can flip Defender’s disk usage. Dive into Event Viewer and sift through logs for Defender warnings or errors around your install or update times.
These checks build a base before attacking high disk usage caused by Windows Defender Antivirus Executable. Skip them, and you’ll chase symptoms, not roots — a classic dead-end. Microsoft’s docs dig deep on Windows Update quirks and disk health tools, two key pillars in tracking Defender’s background work and resource grabs.
Step 1: Disable or Reschedule Windows Defender Scan
- Open Task Scheduler to Access Defender Tasks
Press Windows + R, type taskschd.msc, and hit Enter. Task Scheduler controls when Windows Defender triggers scans. Adjusting these schedules reduces unexpected disk spikes. It’s all about timing.
- Handle To Microsoft Defender Tasks
On the left panel, head to Task Scheduler Library > Microsoft > Windows > Windows Defender. There, you’ll find all scheduled Defender processes, including scans that often cause heavy disk activity.
- Find the Scheduled Windows Defender Scan Task
Scan the list for tasks named Windows Defender Scheduled Scan or similar. These start Defender’s background checks. Identifying them lets you tweak their timing or disable them without compromising protection.
- Check Task Triggers
Right-click on the scan task, select Properties, then open the Triggers tab. This reveals when scans are set to run—often during the day when you’re active on the PC, which can cause unexpected slowdowns.
- Change or Turn Off the Trigger
Pick a trigger, press Edit, then reschedule it to a less busy time—like late at night or early morning. Alternatively, uncheck the box to disable that trigger temporarily. Real-time protection still guards you, avoiding scan overloads during work hours.
- Run Scans Only When Necessary
Disabling automatic scans entirely risks leaving protection gaps. It’s wiser to launch manual scans when you want. This method balances disk load and security.
- Shift Defender’s Automatic Maintenance Times
Open Control Panel > Security and Maintenance. Click Change maintenance settings under Automatic Maintenance and pick a time less likely to interfere with your usage. Defender’s scans are part of this schedule.
- Use Windows Security to Launch Scans Manually
Open Windows Security from Start, go to Virus & threat protection, then Manage settings. The scheduling options here are limited, but you can run quick or full scans manually. That keeps background scans from slowing your disk.
- Watch Disk Usage After Tweaks
Once you reschedule or disable scans, monitor Task Manager’s disk tab around Defender’s usual scan windows. Disk usage should drop majorly, confirming your changes took effect without compromising security.
- Exclude Big Files or Folders to Lighten Scans
Though not a scheduling fix, under Defender’s Virus & threat protection settings, you can add exclusions for large folders or trusted files. This reduces scan duration and disk usage during Defender’s scheduled runs.
Tuning the scan schedule inside Task Scheduler targets the main cause of many disk usage problems. It calms system lag but keeps Defender’s guard up. This method gives you more control, making Defender less intrusive when needed—without disabling protection. Windows Security itself offers limited scheduling tweaks. For advanced setup, Microsoft’s Task Scheduler documentation provides detailed, step-by-step guidance.
Step 2: Exclude the Windows Defender Folder from Scans
- Handle to the Start menu and type “Windows Security,” then click the app to launch it. This centralizes your antivirus controls.
- Within Windows Security, click on “Virus & threat protection.” This is where you manage scanning and threat detection options.
- Under Virus & threat protection settings, find and select “Manage settings.” This section lets you tweak real-time protection and exclusions.
- Scroll down to the Exclusions section and click “Add or remove exclusions.” Adding exceptions here instructs Windows Defender to ignore specific files or folders during scans.
- Click “Add an exclusion” and select “Folder.” Handle to the Windows Defender installation directory, typically located at
C:\Program Files\Windows Defender. Choosing this folder prevents the executable and related files from scanning themselves, which can cause high disk usage. - After selecting the folder, ensure it’s listed under the exclusions. This confirms Windows Defender will no longer scan its own files, cutting down on unnecessary disk activity.
- For changes to fully apply, reboot your device. This resets the antivirus process and clears lingering activity that might spike disk usage.
- After reboot, open Task Manager and keep an eye on disk usage by Windows Defender Antivirus Executable. The exclusion should stop the recursive scanning loop, lowering overall disk consumption.
Key Notes on Exclusions
- Excluding core folders reduces redundant resource consumption, but use this tactic cautiously to avoid exposing your system to hidden threats.
- If your Defender folder location differs due to system customization or enterprise settings, verify the exact path before excluding.
- These steps, part of effective system tuning, can ease performance issues without disabling your antivirus protection.
Properly excluding the Windows Defender directory targets the root of the high disk usage problem, making your system more responsive while retaining security. The Microsoft Security portal documents exclusion management thoroughly, illustrating the impact on scan behavior and disk activity Microsoft Defender Antivirus exclusions guide.
Step 3: Update Windows Defender Definitions and Windows OS
- Launch the Windows Security app from the Start menu to access Defender’s settings directly, ensuring you target the latest update options without detours.
- This section houses the update controls for Windows Defender’s virus definitions — essential for accurate threat detection and system efficiency.
- Manually triggering this forces Windows Defender to download the most recent malware definition files, which can resolve bugs causing excessive disk usage.
- Sometimes the update process stalls due to service glitches. Restarting the Windows Defender Antivirus Service from the Services management console can clear this bottleneck.
- Keeping the entire Windows OS up to date addresses core system bugs as well as compatibility issues that often trigger heavy resource consumption by Defender.
- This action looks for system patches, security fixes, and performance improvements that can indirectly reduce high disk activity from Defender’s executable.
- Postponing these patches can prolong system vulnerabilities and performance issues. Completing installation and rebooting ensures the updates take full effect.
- Sometimes OS updates reset Defender components; checking and applying definition updates again prevents outdated scanning engines from causing disruptions.
- Configuring Windows to apply Defender and OS updates automatically reduces the risk of definition or system lag that triggers high disk usage unexpectedly.
- After installing updates, monitor disk activity through Task Manager to confirm that Windows Defender’s resource footprint has returned to normal levels, ensuring the fix has worked.
Applying the latest virus definitions and OS updates is a foundational step in managing resource-heavy Defender behavior. Detailed knowledge about system update mechanisms, coupled with disciplined maintenance, helps stabilize disk activity without needing to disable essential protection components. The official Microsoft Windows Update documentation provides authoritative guidance on ensuring Defender stays current and efficient at servicing Windows updates.
Step 4: Run a Full Malware Scan to Identify Hidden Threats
Malware and rootkits can hide in your system, making Windows Defender Antivirus Executable suck up all your disk power (give or take). Follow every step closely to uncover and fix what’s driving disk use through the roof. Your computer might drag along like it’s stuck in mud. Running a full malware scan goes deep, rooting out these quiet worms that make your disk work overtime.
- Click Start and type Windows Security. This opens one central hub where Defender’s tools live. Using this dashboard guarantees you run scans with the newest definitions and options.
- This section controls scan launches and real-time shields. It’s where you’ll trigger a detailed inspection aimed at flushing out infections that spike your disk activity.
- Click this button to show different scan types. A quick scan only scratches the surface. You want Full, because it combs every file and corner. Malware often hides so deep it barely leaves a trace, yet it still drags disks into overtime.
- Selecting this tells Defender to check every file and active process, not just the usual suspects. These scans can take hours, but they’re your sharpest weapon when Defender itself is hogging resources and slowing everything down.
- Hit Scan Now And let it churn. Keep an eye on it—if Defender freezes or stalls, you’ll miss critical threats. An interrupted scan leaves malware hiding, rot in your system’s guts.
- When it finishes, dive into what was found. Defender automatically quarantines many threats, but manual review is key to catch false positives or sneaky remnants. Quarantine locks down dangerous files, stopping them from chewing resources or causing fresh havoc.
- After cleanup, reboot as it finishes Defender’s job. This resets system tasks and usually drops disk usage dramatically by clearing heavy Defender operations from memory.
- Set these up on a timer to prevent malware from stacking up and dragging Defender into overtime again. Pick times when you don’t need full speed, so scans won’t wreck your workflow but still catch sneaky bugs.
Running a full malware scan this way resets excessive disk use caused by Defender’s overhead. It bundles detection and removal into one essential sweep. For more, check Microsoft’s official Windows Security documentation.
Step 5: Reset or Repair Windows Defender to Resolve Disk Usage Issues
- Open PowerShell as Administrator. You’ll need admin rights to run system commands safely. Right-click the Start menu, then pick “Windows PowerShell (Admin).”
- This stops the antivirus so it doesn’t lock files while you fix things.
- Corrupted scan cache files often cause spikes in disk use. This command wipes them out.
- Re-register Defender’s core components. Run
Get-AppxPackage Microsoft.SecHealthUI -AllUsers | Reset-AppxPackageto reset Defender’s UI and background services. It reloads executables and refreshes registry entries. - Restart the Defender service. Use
Start-Service -Name WinDefendto turn the antivirus back on. Fresh service settings usually cut down wasted disk activity. - Run the built-in troubleshooter from Windows Settings. Handle to Settings > Update & Security > Troubleshoot > Additional troubleshooters > Windows Defender Antivirus. This tool scans for common Defender errors and tries to fix them automatically.
- Reset the Windows Security app. Go to Settings > Apps > Apps & Features > Windows Security > Advanced options > Reset. This restores the app’s defaults, affecting real-time scanning and how Defender displays itself.
- Restart your PC to apply all changes fully. A full reboot releases stale file handles and locks linked to disk use. Often, disk workload drops sharply once Defender restarts cleanly.
This sequence repairs or resets core Defender files and services behind many disk usage headaches. You clear locked caches, revive app components, and lean on Windows’ built-in patches without poking around system files.
Scan caches flushed.
Resetting Defender slashes stubborn disk thrashing and calms background processes, especially when heavy disk activity lingers after updates or quick fixes. Find a detailed walkthrough at Microsoft Docs on resetting apps.
Summarizing Steps and Extra Advice for Smooth Performance
Windows Defender Antivirus Executable can slam your disk hard. It means you need a plan to quiet Defender’s appetite for your drive. First, make sure Windows is up to date. Updates often tamp down Defender’s resource cravings. Next, check your real-time protection settings — shifting scan times or skipping big, trusted folders can ease disk stress. Beware running other antivirus software alongside Defender; two engines pounding your disk usually spells slow chaos. You want strong defense but smooth running.
- Make sure you’ve installed the latest Windows updates.
- Shift Defender’s scans to off-hours when you’re idle.
- Exclude large, safe folders from real-time scans.
- Try turning off extra Defender features if your system still lags.
- Run a malware scan—hidden infections can push Defender into overdrive.
- Use Task Manager to spot other programs stressing the disk.
- Restart after tweaks to flush cached workload.
Also, keep an eye on disk health. Run Disk Cleanup and Defragmenter often. That sparks resource clashes you want to avoid. Turn on Automatic Maintenance so Windows handles upkeep quietly, without bothering you. Low RAM or tight storage? That makes your disk work overtime. Try scheduling heavy tasks away from Defender’s busiest scans.
Applying these tips turns Defender from a disk hog to a quiet guard, protecting your PC without dragging it down. For detailed tech info about how Defender handles tasks and resources, Microsoft has a thorough guide for IT pros and power users: Microsoft Defender Antivirus Overview.
Common Issues and Solutions for Windows Defender Antivirus Executable Disk Usage
Causes of High Disk Usage by Windows Defender Antivirus Executable
High disk activity often spikes when Windows Defender starts a full scan or updates virus definitions. Corrupted files sometimes trigger these sudden surges. Other security programs may clash, pushing Defender’s disk usage higher. Scheduled scans kicking off while your disk is busy only pile on the pressure. System file errors often add to this tangled situation.
Identifying Legitimate Disk Usage Versus Anomalies
Defender’s disk activity surging during scans is expected. But when it maxes out your disk without any scans running visibly, beware. Persistent heavy disk use without clear tasks usually hints at glitches or conflicts. Open Task Manager and Resource Monitor to tell routine processes from anomalies. This helps you figure out if the usage is normal or something’s broken in the background.
Potential Risks of Ignoring High Disk Usage
Extended periods of heavy disk use drag your system’s responsiveness down. That hard drive can overheat and age faster. Other programs might freeze or stutter. Data corruption isn’t out of the question—interruptions in reading or writing wear down files gradually. Overlooking this can lead to hardware failure and data loss.
Disabling Real-Time Protection as a Temporary Step
Switching off real-time protection slashes disk activity immediately. You’ll find this toggle in Windows Security settings. Don’t keep it off for long: the PC’s defenses lower dramatically. Use this only momentarily for troubleshooting. Reactivate protection as soon as tests finish.
Adjusting Windows Defender Scheduling
Scheduling scans during times when you’re idle can lighten disk load. Task Scheduler lets you control exactly when Defender runs. Consider reducing scan frequency or shifting tasks to off-hours. This keeps disk performance smoother during your busy work sessions.
Clearing Windows Defender’s Cache and Logs
Cache or log files sometimes bloat or become corrupt, causing heavier disk use. Deleting them requires admin access and some digging since they’re hidden in system folders. Clearing these files can resolve those nagging hiccups and help Defender operate more efficiently.
Checking for Conflicting Software
Having multiple antivirus tools active means they compete for system resources. This causes Defender to repeat scans or freeze your disk. Removing other security software or setting proper exclusions prevents overlap. Defender performs best when it’s the sole protector running.
Using PowerShell to Reset Windows Defender
PowerShell offers a way to deeply reset Defender’s config and erase corrupted states behind disk problems. You’ll need admin privileges and some caution when running these commands. A reset script can often fix stubborn issues without reinstalling Windows.
Upgrading Hardware to Mitigate Disk Bottlenecks
When your disk constantly chokes under Defender’s load, switching to an SSD can transform performance overnight. Scans finish faster, and disk stress drops noticeably. Older mechanical drives struggle under heavy scanning, causing lag and speed upd wear. Hardware upgrades help, but don’t forget to also adjust software settings.
Monitoring Disk Usage with Resource Monitor
Resource Monitor breaks down what Defender.exe is grabbing from your disk in real time. Watching this data reveals what exactly hogs your drive. Tracking trends over days or weeks tells you if fixes are actually working or if issues linger.
Keeping Windows Defender Updated
Running outdated virus definitions or an old Defender version drags performance and hikes disk use unnecessarily. Automatic updates are essential. Microsoft pushes patches frequently to lower disk load and make scanning more efficient.
Restoring Default Settings if Tweaks Fail
If you try changing settings but disk usage won’t budge, reset Defender to defaults. This wipes out custom rules, scheduled scans, and exclusions. Starting fresh often flushes unseen conflicts causing those large disk demands.
Ensuring No Background Tasks Overlap With Scans
Windows Update, indexing, and other background chores can clash poorly with Defender’s scanning. This combination sends disk usage soaring. Pausing or staggering these tasks avoids collisions. Coordinated scheduling can smooth disk performance dramatically.
When to Seek Professional Help
If high disk usage doesn’t ease and fixes don’t work, there might be deeper system damage or malware involved. Some viruses mask themselves as Defender processes. Getting help from IT experts or Microsoft support can root out hidden causes. Advanced diagnostics reveal problems that basic checks miss.
These tips cover common reasons for Windows Defender Antivirus Executable dragging your disk down. For full official details on Defender’s system needs and performance, check Microsoft’s documentation here: Windows Defender Antivirus service.